
First, start the DroidCam PC client. You’ll find DroidCam on your Desktop, the Start menu, or in the installation folder under Program Files (x86).
Connect via WiFi

1. On your phone, turn on WiFi and connect to your home network as you normally would.
2. Start the phone app, it will show Wifi IP & Port information. If the IP is all zeros (0.0.0.0) – you are not properly connected to a WiFi network.
3. On the PC client, make sure the connection method is “WiFi/LAN”. Enter the IP and Port as displayed on the phone. Click [start].
4. The phone app should start showing the camera output. The PC client should start updating the “webcam” output, you can check in Skype/Zoom/etc. Find ‘video input’ settings in the options/preferences of these programs.
If the connection fails, try:
– Closing and re-opening the app.
– Toggling the Wifi on phone and/or laptop.
– Restarting your Wifi router (unplug from power, wait a few seconds, and plug it back in).
– Changing the connection port number in the app & client (eg. 4748 ..).
Connect via USB (Android)
1. First, make sure “USB Debugging” is enabled on your phone. Its located in the phones Settings, under Developer Options.
On most phones the Developer Options screen is hidden by default. To unlock it, open the phones Settings and search for Build number (under About section). Tap Build Number seven times to unlock Developer options.
Once unlocked, search for USB Debugging (under Developer Options) and turn it On.
2. With USB Debugging turned on, connect your device to the computer via USB. Windows may find and install the appropriate drivers automatically.
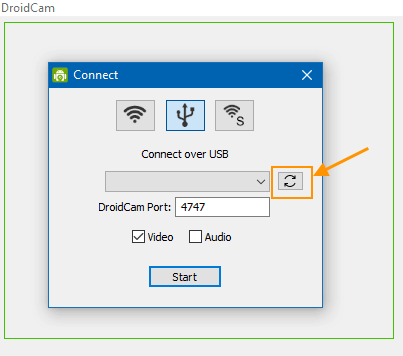
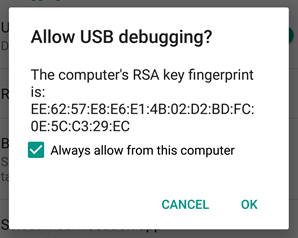
In the DroidCam PC client, pick the USB connection option and click the refresh button. If the client detects your phone, you’ll likely get a dialog on the phone asking Allow USB Debugging. Tap OK to allow the connection. You can also skip the next step.
3. If the device is not detected, you need to install drivers for it as an additional step.
If you have a Google Nexus/Pixel, or a OnePlus, get the Google USB drivers here:
https://developer.android.com/studio/run/win-usb.
Samsung USB drivers:
https://developer.samsung.com/mobile/android-usb-driver.html
LG Mobile Drivers:
https://www.lg.com/us/support/software-firmware-drivers (scroll to Popular Software, LG Mobile Drivers section).
For other brands, this page provides links to most manufacturers websites: http://developer.android.com/tools/extras/oem-usb.html#Drivers.
You can also do a web search, ADB Drivers for ____.
Eg: ADB Drivers for HTC.
After the drivers are installed, re-connect the device to the computer and try Step 2 above again.
4. Once the client detects the phone, click Start to establish a connection just like you would over WiFi.
If you get “connection reset”, “connect lost”, “error receiving video headers” errors:
(1) On the phone, make sure the DroidCam app is open and ready.
(2) On the phone, pull down the notification area and open “USB Options”. Try picking the ‘PTP’ (Picture Transfer), or ‘Camera’, or just ‘Charging’ mode.
If the connection is still failing,
(1) If you skipped the driver installation (step 3) above, try installing the drivers for your phone manually. Sometimes Windows auto-installs incorrect or outdated ones.
(2) Try changing the ‘DroidCam Port’ setting in the app and on the client. Use 4848, 5050, 5151, …
(3) Try this alternate USB setup tool. The tool will detect and setup local port forwarding against all connected devices. If it works, you can replace the adb folder under Program Files x86 > DroidCam with the one in this download.
Connect via USB (iOS)
Wait for Windows to search for and install drivers automatically. To verify: hit the Windows key, search for Apps and Features, click on Open and check for ‘Apple Mobile Device Support’ in the list of apps.
If Apple Mobile Device Support is not listed, you can download and install yourself here:
Apple Mobile Device Support (64-bit).
Make sure to Trust the computer on the phone if prompted:

Click the refresh button on the DroidCam Client ‘USB’ tab and any available iOS devices will be listed as a string of random characters, this is the unique ID of the device. Click Start to establish a connection just like you would over WiFi.
If the device is still not found, you can try getting iTunes in addition to the drivers. Install the desktop version of iTunes by following the Windows link under “other versions” here, or consult this help article by Apple on how to update your drivers.
Connect with internet browsers (Android)
To use the “IP Cam” feature you normally don’t need to install any extra software on the computer.
1. Turn on WiFi on your phone and connect to a WiFi network as you normally would.
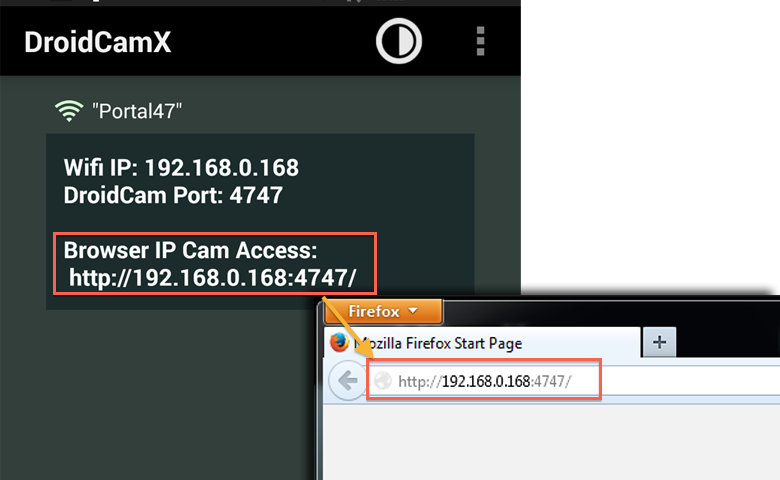
2. The app will show Wifi IP & Port information. If the IP is all zeros (0.0.0.0) – you are not properly connected to a network.
3. Open your internet browser (Firefox, Chrome, etc), and enter http://ip:port into the address bar. This should open a web page with the phone camera feed embedded inside.
If you have DroidCamX, you can edit or clear the overlay text that is added on top of the video.
Tip: Use an MJPEG viewer app or program to access the video feed via http://ip:port/video (eg. on a tablet, another smartphone, or a media player such as VLC). You can specify resolution and add the argument “force” to override existing connections: http://ip:port/video/force/1280x720
WiFi Hotspots, USB Tethering, USB-C Ethernet (Advanced)
On iOS, for USB Tethering you can use standard USB connection option in the DroidCam client (see above).
On Android, you can find the IP address of the phone and enter that into the WiFi tab of the DroidCam client. The easiest way is to open the phones Settings, scroll down to “System” or “About”, and look for the Network section.
With both iOS and Android, also try these standard IPs:172.20.10.1, 10.0.0.1, 192.168.0.1.
Alternatively, on your PC open the Start menu and launch the Command Prompt program. Enter ipconfig and look for ‘router’ or ‘gateway’ address, and use that as the phone IP.
WiFi Server Mode (DroidCamX Only)
1. Use the “WiFi Server” option on the PC client. Click [Start] to wait for a connection.
3. Open DroidCamX on your phone, use the options menu (⋮) and choose “Connect to Server”. You will need the computers local IP address (usually 192.168…), look in your network settings or open a Command Prompt and type in ipconfig.
Note: This is a legacy feature and may not be supported with future updates
Image input